Adding IO-Points with the Arduino Yun
 Once you have created your object and added a marker as well learned about how to add web content, the next step towards creating a Hybrid Object is to link the Arduino that you have set up as your object to the Reality Editor using so called IO-Points.
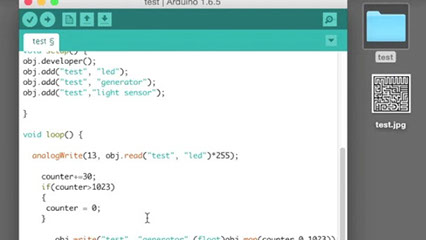
For this example, we are using a file called test.ino. When uploaded, this sketch will cause the led to blink when connected to the generator.
Here is the code:
/*Read from and Write to a Hybrid object created 2015by Valentin Heun*/ #include <HybridObject.h>HybridObject obj; int counter =0; void setup() { obj.developer(); obj.add("test", "led"); obj.add("test", "generator"); obj.add("test","light sensor");} void loop() { analogWrite(13, obj.read("test", "led")*255); counter+=30; if(counter>1023) { counter = 0; } obj.write("test", "generator",(float)obj.map(counter,0,1023)); obj.write("test", "light sensor",(float)obj.map(counter,0,1023)); delay(30);}
Here’s what the code means:
HybridObject obj : This is your hybrid object.
obj.developer() : This line allows you to use the developer functions with your hybrid object.
obj.add(“test”,”led”) : This line creates a new IO-Point in the hybrid object named "test" and associates the name "led" to it.
obj.read(“test”,”led”) : This line allows your object to read from the IO-Point. You never have to indicate if it is an input or an output, that work will be done for you.
analogWrite(13, obj.read(“test”,”led”) *255) : analogWrite allows you to write to a pin on your Arduino. In this case, we are telling the Arduino’s 13th pin to be written to by what we read from the "led" IO-Point.
As such, there are 4 simple functions to interact with your Hybrid Object:
.developer()
.add([ObjectName], [I/OName])
.read([ObjectName], [I/OName])
.write([ObjectName], [I/OName], value)
Linking IO-Points via the interface
 Make sure that your computer, iOS-Device and Arduino Yun used in this tutorial are in the same private local Network. Cooperate Networks are not supported.
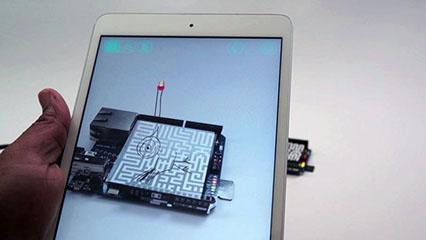
Now we can return to the Reality Editor app.
The app has two different modes to interact with what it is visually processing. So far, we’ve been operating under the first selection:
 But now that we have added IO interactions to our object, we can hit the second button in the right-hand corner. This view will allow us to link IO points that we have attached to our device.
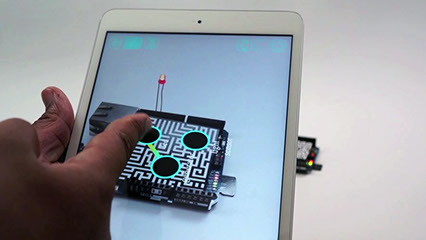
Now we can connect our “generator” IO to the “led” IO that we created in the Arduino code. When we do this, we will see that the led on our Arduino will begin to reflect the code. To create this connection, simply drag from the “generator” IO to the “led”. After doing this, you should see a link like in the screenshot below.
 This link is telling you that the “led” object is taking the “generator” object as input.
To break a link, simply drag your finger over the link itself.
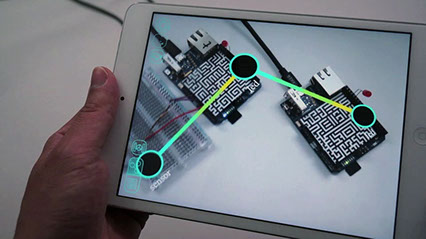
You can also create links between entirely separate Hybrid Objects. For instance, we could connect the “sensor” IO from one object to the “led” IO on another.